
Whether you’ve chosen to change your exterior aesthetic or are just looking to cover up a little wear-and-tear, restaining a fiberglass exterior door is a simple solution to revamping a house’s exterior. Fiberglass door stain kits help prevent the process from becoming overwhelming by providing the materials you’ll need to restain and achieve the desired visual outcome. Keep reading to learn how to restain a fiberglass exterior door. For step-by-step guides treating Plastpro’s fiberglass door series, see our Knotty Alder, woodgrain, and PF Frame staining guides or our how-to video.
Preparation for restaining a fiberglass door
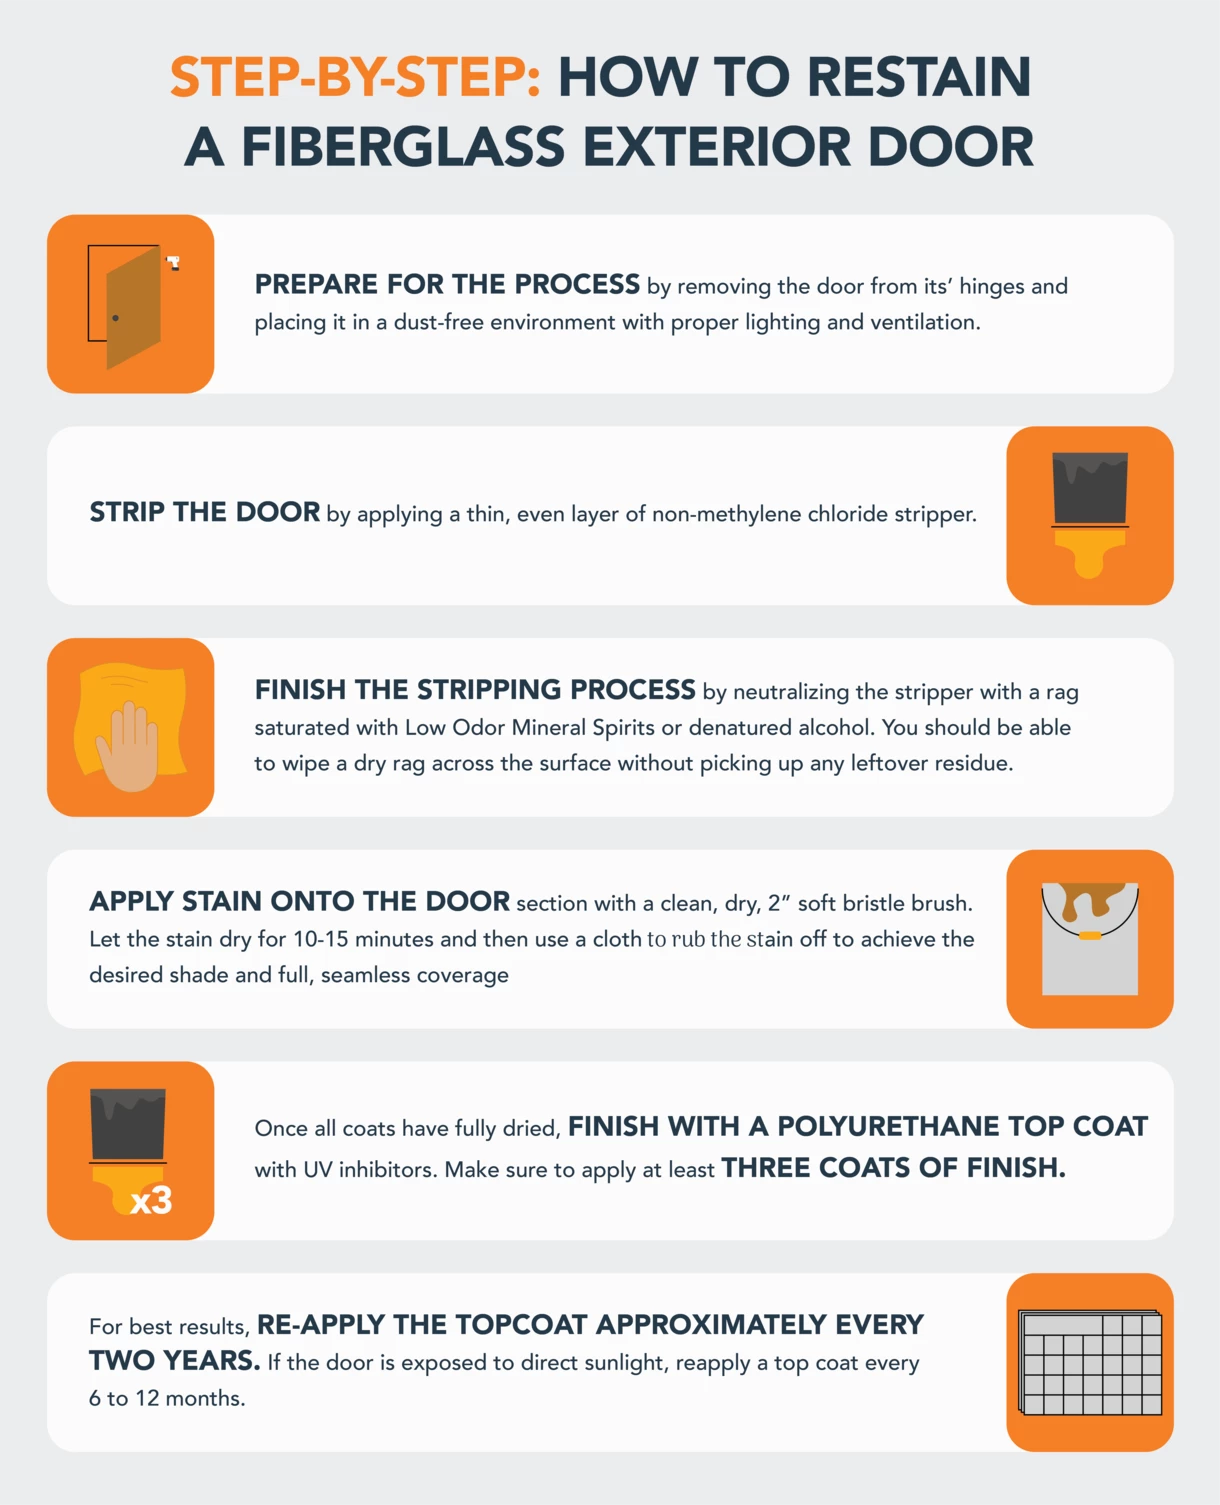
When it comes to restaining a fiberglass exterior door, the prep work is crucial. Prep both your staining environment and the door itself to ensure all goes according to plan. Before you begin, thoroughly read through the door manufacturer’s instructions and product warranty for specific precautions.
- Start in a dust-free environment with proper lighting and ventilation, and read all product cautions carefully, as you’ll be working with chemicals.
- Remove the door from the hinges by using a hinge pin removal tool or, if necessary, tap the hinge pins loose with a hammer and nail.
- Place your door on supports (flat padded sawhorses are preferable) and remove all the hardware, including the locks, doorknobs, and the fiberglass door’s weatherstripping.
- Prep the surface of the fiberglass door by covering or masking off any glass/windows and any weather stripping that wasn’t removable in addition to the door jamb.
- Before you begin the staining process, ensure you thoroughly read all instructions based on your stain kit. Each stain kit will have set up guidelines specific to the manufacturer. If you are using Plastpro’s stain kits, it is recommended to stain when temperatures are between 50°F - 90°F and humidity is below 85%. Be sure not to set up your door in direct sunlight or when dew is present.
How to strip the door
In order to properly restain your fiberglass exterior door, you’ll want to make sure you follow all the correct steps for stripping the door. To strip Plastpro doors, refer to the Stain Stripping Guide.
- Begin removing the old finish by applying a thin, even layer of non-methylene chloride stripper —you can use the same ones you would as if the door was made of actual wood.
- For most strippers it is recommended to leave the product on for around an hour, but be sure to reference the fiberglass door company and stripper manufacturer’s instructions for the most accurate time frame. Watch for when the paint begins to soften—if you leave it on for too long, it can damage the fiberglass.
- Once the stain starts loosening, scrape it off with a putty knife. Lightly scrape the coating off in the direction of the wood grain without denting the surface. You may need to apply additional layers of product to fully strip the stain.
- Once you’ve removed the various layers, make sure the door is dust-free and sand it down with 120-grit paper for a smooth finish.
- Finish the stripping process by neutralizing the stripper—just wipe the entire surface with a rag saturated with Low Odor Mineral Spirits or denatured alcohol. Repeat this cleaning process until you can wipe a dry rag across the surface without picking up any leftover residue. Allow the door to dry completely.
Stain kits make the process a breeze
Apply your selected stain to achieve the perfect finish. Plastpro’s all-inclusive Pre-Finish Stain Kits contain everything you’ll need to stain your fiberglass exterior door.
Note: Staining instructions are for Oil-Based, Premium Quality Wood Stains, or similar products designed for use on a fiberglass surface. Please note the instructions indicated are specific to the Zar brand stain included in our stain kit. Please reference the stain manufacturer’s instructions before applying any stain.
- Stir the stain delicately to avoid creating any bubbles. Do not shake the stain container.
- Apply stain onto each door section with a clean, dry, 2” soft bristle brush. Let the stain dry for 10-15 minutes and then use a cloth to rub the stain off to achieve the desired shade and full, seamless coverage. Clean the perimeter of the door as needed with a rag.
- Once you’ve fully stained your door, clean any excess or drips while the stain is still wet. Let the first stain dry thoroughly per the stain manufacturer’s recommendation before applying the second coat of stain. Temperature and conditions will affect dry time. If you want a darker appearance, wait until the stain is fully dry on both sides before applying subsequent coats. Do not sand or prime between coats.
- Once all coats have fully dried (per stain manufacturer’s directions), finish with a polyurethane top coat with UV inhibitors like ZAR™ Exterior Polyurethane, Wood Kote® Flagship UV, or Minwax® Fast Drying Polyurethane for exterior applications to seal the stain and protect the door from weather impact. Mix the top coat well and apply evenly, using a clean, dry, 2” foam brush. Be sure to stop when the grain changes direction.
- Apply three coats of finish, allowing at least 3 hours of drying time between each application.
Maintenance and Care
Even a well-finished fiberglass door will be affected by exposure and weathering from the sun, moisture, and air pollutants. It is considered normal maintenance to re-apply the topcoat approximately every two years. If the door is exposed to heavy amounts of direct sunlight throughout the day, it is recommended to reapply a top coat every 6 to 12 months.
Check out Plastpro’s Where to Buy page to find the closest distributor for fiberglass doors, fiberglass door pricing, and fiberglass door stain kits. For staining Plastpro’s fiberglass door types see the How to Stain Knotty Alder, How to Stain Woodgrain, How to Stain PF Frames, and How to Strip Stain guides.
Note: Due to the variability in finishing materials, application conditions, and techniques, all of which are beyond the control of Plastpro, Plastpro cannot be responsible for the performance of field applied finishes or individual application techniques.