
General trimming information
- Recommendation: carbide tip saw blades for trimming doors
- Record all data from top of door prior to trimming
- Break all sharp corners after cutting (320 grit sand paper or equivalent)
- To locate hinge side of door, look on the bottom of the door and locate the 1-1/4” fill hole. The hinges MUST be located on the same side as the fill hole.
Trimming Door Top
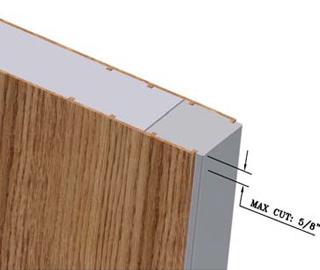
The top of the door has a maximum trim amount of 5/8”. Exceeding this limit is not recommended. Trimming the top of the door will cut off all information pertaining to the door. Record all data from top of door prior to cutting.
Trimming Door Bottom
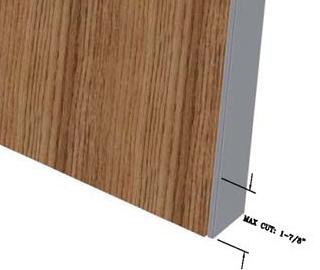
The bottom of the door has a maximum trim amount of 1-7/8”. Exceeding this limit is not recommended. If bottom of door is trimmed, there are 3 options for attaching the bottom sweep.
- Glue bottom sweep to door.
- Re-router bottom of door to match the same dimensions that were factory machined.
- Staple bottom sweep to door.
Trimming Door Sides (stiles)
For a better cosmetic appearance, the skin ribs on the door assembly should be avoided when trimming the sides of your door. Follow the dimensions below:
- When trimming ¼” or less off of overall size; trim equivalent amount off of BOTH stiles.
- When trimming ¼” to ½” off of overall size; trim from only ONE stile.
- When trimming ½” to 2-1/8” off of overall size; trim equivalent amount off of BOTH stiles. Trimming equivalent amounts will keep any panels centered.
Finishing Door Sides (stiles)
Lightly sand and apply primmer to all stile edges prior to finishing the coat of paint on the stile edge. The door skins do not need any primer or sanding. Follow finish coat paint manufacturer’s recommendations for all other procedures.
Door Hardware Installation
Pre-drill pilot holes into the stile edges for all screw holes prior to hinge and handle installation. Follow hardware manufacturer’s recommendations for all other procedures.
You May Also Like
 Installation
How to Replace a Door Slab
 Installation
How to Measure a Rough Opening
 Installation
How-to: Install Clavos and Hinge Straps
Ready for More Inspiration?
Your next big idea starts here. Subscribe to Inspiration & Insights
Note: We're always on the lookout for beautiful, innovative, and standout Plastpro projects. If you have one in mind, please email [email protected]