How to replace an exterior door slab

Replacing a door is a project within the capabilities of most do-it-yourselfers. Throughout the installation, take care not to damage or disturb the door frame and trim. These instructions are general; always follow the manufacturer’s directions for the specific product you are using. Your retailer will help you plan the project and advise you on what products are available to help.

Step 1

To remove the original door, open it and place a wedge under the outer corner, taking the weight off the hinges.

Step 2
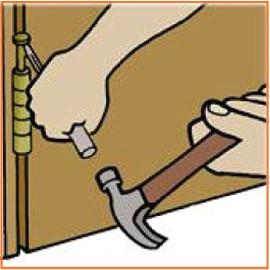
Most doors are hung on loose-pin hinges–half of the hinge is attached to the door and the other half to the door frame, with the two halves held together by a pin. To remove the pin, tap it up, then pull it out completely. Start at the bottom hinge and repeat this procedure at the center and top hinges. Now you can remove the door from its frame.

Step 3

Unless the old door is badly warped or damaged, set it aside to use as a pattern for trimming the new one.

Step 4
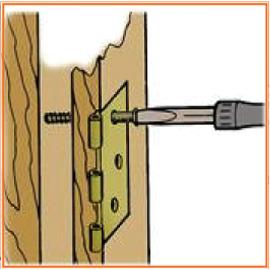
Next, remove the hinge leaves from the door and the frame. You will probably want to install new hinges along with the new door. If so, make sure the new hinges are the same size as the old ones.

Step 5

Reinstall the hinge leaves on the door frame, using screws that are long enough to go through the frame and grip well into the stud-wall framing as a security measure.

Step 6

If the original door is usable as a pattern, place it on the new door, carefully aligning the top and side edges. The new door may need to be cut down slightly; mark the difference along the bottom of the old door. If the old door is not suitable for this purpose, measure the door opening, allowing a 1/8″ clearance at the bottom (3/4″ or more if the door opens over carpeting) and 1/16″ at the top and sides. Transfer these dimensions to the new door.

Step 7

Mark the location of the hinge mortises on the edge of the door, using the old door as a pattern. (Mortises are the carved or routed-out depressions that accept the hinge blades, leaving them flush with the surface.) If you’re not using the old door as a pattern, place the new door in the opening, wedging it 1/8″ from the bottom, and mark the hinge locations on the door.

Step 8
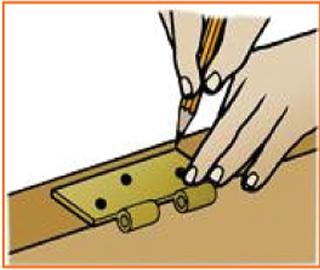
Now set the door on its latch edge. With a try square or combination square and a sharp pencil or knife, mark a line across the door edge at each hinge location, then use the hinge leaf as a template to outline the hinge on the door. This indicates the location of the hinge mortises.

Step 9
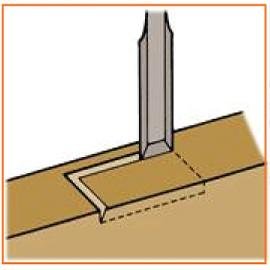
With a sharp wood chisel, score around the marked edges for the mortises. Be careful that you don’t cut more deeply than the thickness of the hinge leaf.

Step 10
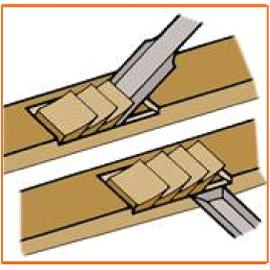
Hold the chisel at an angle with its beveled edge down and make several cuts inside the scored area to the proper depth for the mortise.

Step 11

Clean out the mortise by cutting away the wood chips with the chisel. Place the hinge leaf in the mortise to check the fit, but do not fasten the hinge yet.

Step 12

Nearly all interior and exterior doors are taller than 6′. They require three hinges to properly distribute the weight. The middle hinge should be halfway between the top and bottom hinges.

Step 13

Attach the hinge leaves to the door with wood screws.

Step 14

Place the door in the frame and insert the top pin, then the bottom pin. Check the fit. If it’s satisfactory, close the door and mark the location of the middle hinge on the door frame.

Step 15

Remove the door (bottom hinge pin first, then top).

Step 16

If there were three hinges on the original door, your middle hinge should use the same door frame mortise as the old hinge. If there were only two hinges, use the hinge leaf as a template and outline the location of the intermediate hinge on the door frame. Cut the mortise on the frame as described previously for door mortises. Attach the intermediate hinge leaf to the door frame.

Step 17

Set the door in place and insert the hinge pins, working top to bottom. 

Plastpro, Inc. will not be responsible for any injuries, damages, claims, actions or losses of any kind whatsoever arising from the use or misuse of the information and/or instruction contained herein.

*For Installation Instructions, please check our website www.plastproinc.com
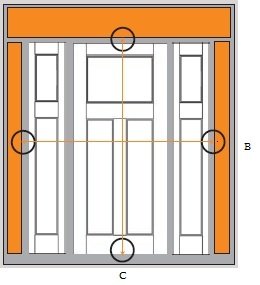
Measure Your Entryway – for Pre-hung Units Only

  1. To ensure accurate measurements, first remove the interior casing on the sides and top of your single or double door to reveal rough opening frame.
  2. Measure from inside the face of one stud to inside the face of the other stud and write down the measurement.
  3. Measure from the subfloor (plywood or concrete) to the bottom of the header above the door and write down the measurement.
    Measurement B:_________ Measurement C:__________

Configuration Actual Size Rough Opening 
6/8Single 3/0 DoorDoor:
3/0 x 6/8 =35-3/4” X 79-1/4”
3/6 x 6/8 =41-3/4” X 79-1/4”

Sidelite:
1/0 x 6/8 = 11-7/8” x 79-1/4”
1/2 x 6/8 = 13-7/8” x 79-1/4”
38-3/8” X 82-1/2”
Single 3/6 Door44-3/8” X 82-1/2”
Single 3/0
One 12” sidelite
51-7/8” X 82-1/2”
Single 3/0
One 14” sidelite
53-7/8” X 82-1/2”
Single 3/0
Two 12” sidelites
65-3/8” X 82-1/2”
Single 3/0 
Two 14” sidelites
69-3/8” X 82-1/2”
Double 3/0 Door74- 7/8” X 82-1/2”
7/0Single 3/0 DoorDoor:
3/0 x 7/0 =35-3/4” X 83-1/4”
3/6 x 7/0 =41-3/4” X 83-1/4”

Sidelite:
1/0 x 7/0 = 11-7/8” x 83-1/4”
1/2 x 7/0 = 13-7/8” x 83-1/4”
38-3/8” X 86-1/2”
Single 3/6 Door44-3/8” X 86-1/2”
Single 3/0
One 12” sidelite
51-7/8” X 86-1/2”
Single 3/0 
One 14” sidelite
53-7/8” X 86-1/2”
Single 3/0 
Two 12” sidelites
65-3/8” X 86-1/2”
Single 3/0 
Two 14” sidelites
69-3/8” X 86-1/2”
Double 3/0 Door74- 7/8” X 86-1/2”
8/0Single 3/0 DoorDoor:
3/0 x 8/0=35-3/4” X 95-1/4”
3/6 x 8/08 =41-3/4” X 95-1/4”

Sidelite:
1/0 x 8/0 = 11-7/8” x 95-1/4”
1/2 x 8/0 = 13-7/8” x 95-1/4”
38-3/8” X 98-1/2”
Single 3/6 Door44-3/8” X 98-1/2”
Single 3/0 
One 12” sidelite
51-7/8” X 98-1/2”
Single 3/0 
One 14” sidelite
53-7/8” X 98-1/2”
Single 3/0 
Two 12” sidelites
65-3/8” X 98-1/2”
Single 3/0
Two 14” sidelites
69-3/8” X 98-1/2”
Double 3/0 Door74- 7/8” X 98-1/2”

Our decorative clavos and hinge straps are handcrafted from durable aluminum that resists rust and discoloration. Add a distinct and unique element to your Rustic door and create something that is truly your own.

Step 1: Before you Begin

Please note: The door must be pre-finished before applying clavos and hinge strap(s). If you have not pre-finished your door yet, please click here and learn how to stain your Plastpro door:
https://www.plastproinc.com/how-to-guides/how-stain-woodgrain

Step 2: Determine and Mark Placement Locations

Determine placement of clavos and hinge strap(s). Below are a few examples of possible placement options. Next, use masking tape and mark each location.

Step 3: Prepare the Door

Remove one tape at a time. Moisten a clean cloth with water and wipe the surface clean of any dust. Repeat for each placement. Cleaning the surface ensures maximum adherence.

Step 4: Apply the Clavos and/or Hinge Straps

Remove the 3M backing paper and attach the clavos and hinge strap(s) to the door. Press firmly to ensure a good bond. Repeat for each accessory. Once in position, the clavos and hinge strap(s) are intended to be permanent.

General trimming information

  1. Recommendation: carbide tip saw blades for trimming doors
  2. Record all data from top of door prior to trimming 
  3. Break all sharp corners after cutting (320 grit sand paper or equivalent) 
  4. To locate hinge side of door, look on the bottom of the door and locate the 1-1/4” fill hole. The hinges MUST be located on the same side as the fill hole.

Trimming Door Top

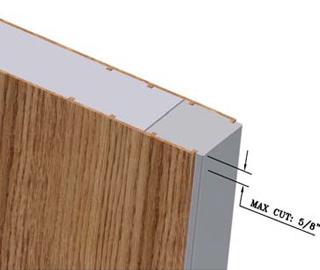
The top of the door has a maximum trim amount of 5/8”. Exceeding this limit is not recommended. Trimming the top of the door will cut off all information pertaining to the door. Record all data from top of door prior to cutting.

Trimming Door Bottom

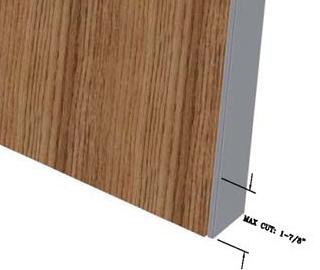
The bottom of the door has a maximum trim amount of 1-7/8”. Exceeding this limit is not recommended. If bottom of door is trimmed, there are 3 options for attaching the bottom sweep. 

  1. Glue bottom sweep to door.
  2. Re-router bottom of door to match the same dimensions that were factory machined. 
  3. Staple bottom sweep to door. 

Trimming Door Sides (stiles)

For a better cosmetic appearance, the skin ribs on the door assembly should be avoided when trimming the sides of your door. Follow the dimensions below:  

  1. When trimming ¼” or less off of overall size; trim equivalent amount off of BOTH stiles. 
  2. When trimming ¼” to ½” off of overall size; trim from only ONE stile. 
  3. When trimming ½” to 2-1/8” off of overall size; trim equivalent amount off of BOTH stiles. Trimming equivalent amounts will keep any panels centered.

Finishing Door Sides (stiles)

Lightly sand and apply primmer to all stile edges prior to finishing the coat of paint on the stile edge. The door skins do not need any primer or sanding. Follow finish coat paint manufacturer’s recommendations for all other procedures.

Door Hardware Installation

Pre-drill pilot holes into the stile edges for all screw holes prior to hinge and handle installation. Follow hardware manufacturer’s recommendations for all other procedures.

For easy improvement projects, Plastpro’s Reversible Plank Wall Panels and Trim Kit offer a beautiful and durable way to customize your home’s interior. Made from high-strength, PVC material, these products are resistant to water damage, easily cleaned, and low-maintenance. Available options: smooth finish 3 ft. and 8ft. plank wall panels, and matching trim kit.

Installation Instructions

NOTE: For easy installation, use Liquid Nails or a similar quality panel adhesive. For better holding strength, use nails. Angle all nails and drive nails within ¼ in. of the surface with a hammer. Then tap the board into place with a hammer and a wood block to protect the planking. For a better, square fit, slightly angle the tongue of the planking to the groove. Mild expansion and contraction due to temperature fluctuation should be expected; therefore, do not press the planks against each other too tightly. These panels are for interior use only and non-commercial grade- do not install in areas that will have heat over 120 °F.

Step 1: Base Trim

Step 1: Base Trim

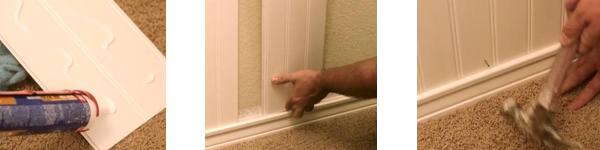
Measure the correct length and then cut for an accurate fit on the wall. Saw into the surface for a cleaner edge. Apply Liquid Nails or a similar panel adhesive in a zigzag pattern before installing. Apply the panel to the wall, making sure the base trim piece has the pre-grooved end up. Check to see if the trim pieces are correctly aligned and level. For better holding strength, use nails (see the Note above). Fill in any gaps with caulk or wood putty.

Step 2: Plank Wall Panels

Step 2: Plank Wall Panels

Insert each plank wall panel into the groove of the base trim. Apply Liquid Nails or a similar panel adhesive in a zigzag pattern before installing. For better holding strength, use nails (see the Note above). Each piece is tongued and grooved for a better fit and simple application. Begin at an inside corner and work left to right if you are right-handed, and right to left if you are left-handed. Keep the groove edge toward the starting corner, and the tongue edges toward your work direction. Nailing top, bottom, and every 16 in. to 32 in. will ensure adhesive contact to the planks. Allow space between planking for expansion and contraction. Measure and fit the next planks carefully. The last plank may have to be trimmed to fit into a corner.

Step 3: Chair Rail

To complete the job, make sure all planks have been applied to the base trim correctly and check to see that the product is level against the wall. Then apply the chair rail on top of the planks after measuring for the correct length. The chair rail is pre-grooved at the bottom to fit over the planks. For additional holding strength, use nails (see the Note above). Fill in any gaps with caulk or wood putty.

Maintenance

Regularly cleaning your planking with a damp cloth will leave it looking just like new. Choose water or a mild solution and avoid cleaning with acetone or any heavy-duty solvent. For best results, spot test any cleaner before using on this product.

Plastpro Reversible Wall Paneling is a vinyl product. Paint selection should based on the paint manufacturer’s recommendations and instructions for coating vinyl products.

Recommended Door Installation, Care & Maintenance

  • Plastpro sells an unfinished door product, and requires finishing the door less than a month after site installation to minimize any potential cosmetic issue.
  • Do not expose door to extreme environmental elements in the time periods of: storage, installation, or other home maintenance (i.e. roof removal, etc.).
  • Machined doors cannot be stored outside on site prior to installation. On site pre-hung doors with no face bore protection from the weather will void the warranty. Unprotected exposure of the doors internal reinforced material during handling violates our doors’ hydro-shield design.
  • Any accident, negligence, abuse, or improper installation of the door. Installed in abnormal or extreme locations or situations.
  • Improper finishing or assembly of hardware, such as the lack of applying the sealant properly for the lockset that may compromise our doors internal reinforced material.
  • Any improper pre-installation storage issues.
  • Any water and / or air infiltration damage due to inadequate installation.
  • Doors trimmed more than 5/8” off the bottom of the maximum length, or any alteration(s) to the door skin that could affect and / or change the skin thickness, will void the terms of this Limited Warranty.
  • See our staining / painting guides, and our installation topics on our website “How To Guides” How To Guides

Failure to comply with any of the above issues will cause the warranty to be void.