
How to replace an exterior door slab
Replacing a door is a project within the capabilities of most do-it-yourselfers. Throughout the installation, take care not to damage or disturb the door frame and trim. These instructions are general; always follow the manufacturer’s directions for the specific product you are using. Your retailer will help you plan the project and advise you on what products are available to help.
Step 1
To remove the original door, open it and place a wedge under the outer corner, taking the weight off the hinges.
Step 2
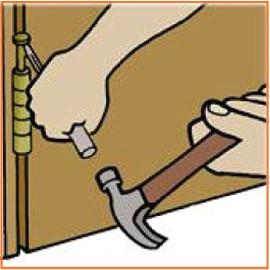
Most doors are hung on loose-pin hinges–half of the hinge is attached to the door and the other half to the door frame, with the two halves held together by a pin. To remove the pin, tap it up, then pull it out completely. Start at the bottom hinge and repeat this procedure at the center and top hinges. Now you can remove the door from its frame.
Step 3
Unless the old door is badly warped or damaged, set it aside to use as a pattern for trimming the new one.
Step 4

Next, remove the hinge leaves from the door and the frame. You will probably want to install new hinges along with the new door. If so, make sure the new hinges are the same size as the old ones.
Step 5
Reinstall the hinge leaves on the door frame, using screws that are long enough to go through the frame and grip well into the stud-wall framing as a security measure.
Step 6
If the original door is usable as a pattern, place it on the new door, carefully aligning the top and side edges. The new door may need to be cut down slightly; mark the difference along the bottom of the old door. If the old door is not suitable for this purpose, measure the door opening, allowing a 1/8″ clearance at the bottom (3/4″ or more if the door opens over carpeting) and 1/16″ at the top and sides. Transfer these dimensions to the new door.
Step 7
Mark the location of the hinge mortises on the edge of the door, using the old door as a pattern. (Mortises are the carved or routed-out depressions that accept the hinge blades, leaving them flush with the surface.) If you’re not using the old door as a pattern, place the new door in the opening, wedging it 1/8″ from the bottom, and mark the hinge locations on the door.
Step 8
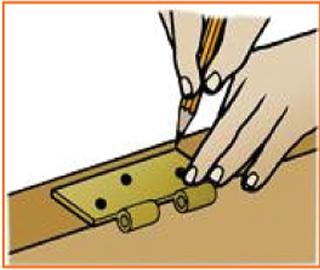
Now set the door on its latch edge. With a try square or combination square and a sharp pencil or knife, mark a line across the door edge at each hinge location, then use the hinge leaf as a template to outline the hinge on the door. This indicates the location of the hinge mortises.
Step 9
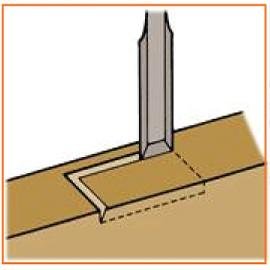
With a sharp wood chisel, score around the marked edges for the mortises. Be careful that you don’t cut more deeply than the thickness of the hinge leaf.
Step 10
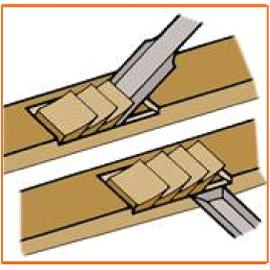
Hold the chisel at an angle with its beveled edge down and make several cuts inside the scored area to the proper depth for the mortise.
Step 11
Clean out the mortise by cutting away the wood chips with the chisel. Place the hinge leaf in the mortise to check the fit, but do not fasten the hinge yet.
Step 12
Nearly all interior and exterior doors are taller than 6′. They require three hinges to properly distribute the weight. The middle hinge should be halfway between the top and bottom hinges.
Step 13
Attach the hinge leaves to the door with wood screws.
Step 14
Place the door in the frame and insert the top pin, then the bottom pin. Check the fit. If it’s satisfactory, close the door and mark the location of the middle hinge on the door frame.
Step 15
Remove the door (bottom hinge pin first, then top).
Step 16
If there were three hinges on the original door, your middle hinge should use the same door frame mortise as the old hinge. If there were only two hinges, use the hinge leaf as a template and outline the location of the intermediate hinge on the door frame. Cut the mortise on the frame as described previously for door mortises. Attach the intermediate hinge leaf to the door frame.
Step 17
Set the door in place and insert the hinge pins, working top to bottom.
Plastpro, Inc. will not be responsible for any injuries, damages, claims, actions or losses of any kind whatsoever arising from the use or misuse of the information and/or instruction contained herein.
*For Installation Instructions, please check our website www.plastproinc.com
You May Also Like
 Installation
How to Measure a Rough Opening
 Installation
How-to: Install Clavos and Hinge Straps
 Installation
How to Trim a Trimmable Door
Ready for More Inspiration?
Your next big idea starts here. Subscribe to Inspiration & Insights
Note: We're always on the lookout for beautiful, innovative, and standout Plastpro projects. If you have one in mind, please email [email protected]