

Materials Needed:

- 1Tape Measure
- 2Framing Square
- 3Level
- 4Electric Drill / Screwdriver
- 51/8" Drill Bit
- 6Hammer
- 7Water Base Putty
- 8(17) 3" Installation Screws
- 9Quality Exterior Grade Caulk
- 10Hand Saw
- 11Router (recommended) or Chisel
- 12Wood Shims
- 138p Finish Nails
- 142 Galvanized Dry Wall Screws
How to Install a Pre-hung Unit
About the Material
This product is extruded using the latest vinyl blended Composite Cellular PVC Technology. The frame and material have been thoroughly tested for better stiffness than traditional 100% PVC foam profile, The PF Frame composite doorframe provides superior performance, with high durability and low maintenance, offering a Hydroshield feature compared to traditional PVC or wood doorframes. The frame can be installed with standard carpenter tools.
Prepare the opening
Always prepare the opening before you attempt to set the jamb.
Before you attempt to set a jamb make sure the rough opening is square, plumb, and in the same plane. Any issues left uncorrected will become bigger problems later.
Correct Cross Leg
If you set a jamb into an opening with cross-legged
walls, the door won’t lay flat against the jamb and the door stop. You might even think
the door is warped, when it isn’t. There are two ways to check for cross-legged walls.

Drive a nail or screw into each corner of the rough opening, then run a string around the four screws, creating an X at the middle of the doorway (Fig.1).

The two strings should touch each other at the X (Fig.2). If they don’t, try to move the walls at the bottom of the opening—just a little. Use a small sledge hammer and a block of wood and tap the bottom of each wall lightly. You want to move each wall a little at a time until the strings touch or are close to touching. Don’t worry about getting it all. You can correct crosslegged walls when you set the jamb, too.
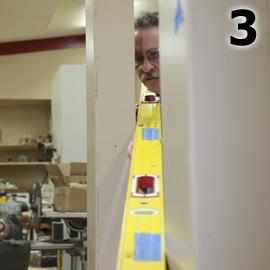
You can also check for cross-legged walls by cross sighting a jamb. If the jamb isn’t in a narrow hallway, stand to one side of the rough opening and sight across the edge of the jamb nearest you to the opposite edge of the jamb farthest from you (Fig.3). You’ll need to move your head in order to sight along both edges. Once your head is positioned, look up and down the edge of the nearest jamb. The edge of the farthest jamb should remain parallel. If it doesn’t, the walls are cross-legged; you can see how much the walls must be moved in order to correct the condition.
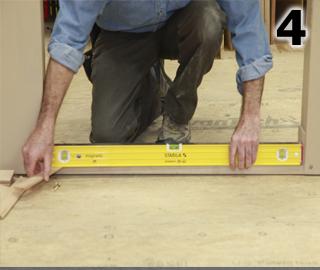
Level the floor
Don’t wait until the jamb is in the opening to level the floor. Instead, place a level on the floor and shim it until it is level (Fig.4). If you’re installing the door on a finished floor—like stone, tile, or hardwood, you can measure the thickness of the shim and cut that amount off the opposite leg. If the flooring isn’t installed, leave the shim in place and set the jamb on top of it.Shim the rough opening
Most rough openings are framed too big and must be shimmed in before setting the jamb, otherwise piles of shims must be inserted between the jamb and the framing. Use plywood squares to shim in the rough opening so that the ‘corrected’ rough opening is 1/8” wider than the outside dimensions of the door.If the door is in a hallway or other critical location, be sure to center the corrected rough opening, so that casing and drywall reveals will be equal on both sides of the finished door.
DO NOT SHIM BEHIND THE HINGES. Shimming behind the hinges before setting the jamb will prohibit you from making critical adjustments to hinge gaps and will prevent you from making necessary adjustments to strike gaps.
Pin the door in the opening
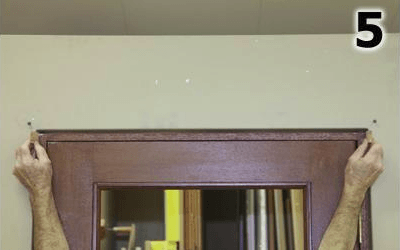
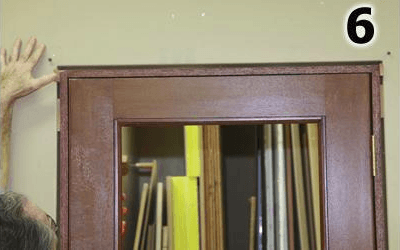
Place the jamb in the opening, and then remove the fastening screws or temporary latch. Insert two shims at the top of the jamb on opposite side of the head jamb. These two shims will safely secure the jamb and the door in the opening (Fig.5). Adjust the top of the jamb so that it is flush with both sides of the wall—or as close as flush as possible, so that installing the mitered casing will be easier (Fig.6).
The first five fasteners
Install the first five fasteners in precisely the correct locations and in
exactly the right order. Otherwise, you may not be able to adjust the door properly.
*Note:
In this instructional example, we are driving screws through pre-drilled, counter-sunk holes
in the face of the jamb. Instead, drive 15ga finish nails at each location, or drive screws
close to the shoulder of the lower rabbet, where the kerf-in weatherstripping will hide the
screws.
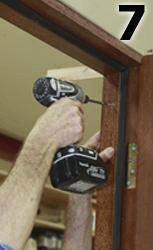
Fastener #1
Drive Fastener #1 up near the top of the
hinge jamb—as high on the jamb as possible (Fig.7). Do not shim behind Fastener
#1. Shims are already installed at the top of the jamb.
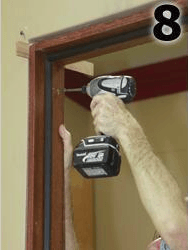
Fastener #2
Drive Fastener #2 up near the top of the
strike jamb—as high on the jamb as possible (Fig.8). Do no shim behind Fastner #2.
Shims are already installed at the top of the jamb.

Fastener #3
Fastener #3 must be driven at the very
bottom of the hinge jamb, as close to the floor as possible (Fig9). But before driving
Fastener #3, correct any remaining cross-leg. Move the bottom of the hinge jamb in or
out of the wall until the door is lying flat against the strike jamb. If the jamb is
severely cross-legged, don’t try to correct it entirely on the hinge jamb—you
can still correct cross-leg before driving Fastener #4 (this is especially important
with pairs of doors). You may need to insert an additional shim to back up the jamb
before driving Fastener #3 .
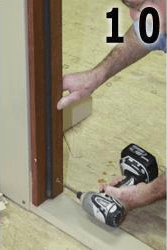
Fastener #4
Fastener #4 must be driven at the very bottom of
the strike jamb, as close to the floor as possible (Fig.10). But before driving
Fastener #4, correct any remaining cross-leg. Move the bottom of the strike jamb in
or out of the wall until the door is lying perfectly flat against the strike jamb.
If you’re installing a pair of doors, be sure that both doors are flush from
the top to the bottom before driving Fastener #4.
In order to maintain a consistent and acceptable strike gap approximately 1/8”, you may need to insert an additional shim to back up the jamb before driving Fastener #4.
Fastener #5
Fastener #5 corrects a serious issue with
pre-fit doors—especially heavy pre-fit doors. The weight of a door will pull down on
the top hinge, placing the top hinge under tension. That tension will increase the hinge
gap above the top hinge (Fig.11). If the hinge gap above the top hinge is not corrected,
it maybe not be possible to correct the strike gap and the door may rub against the
strike jamb.
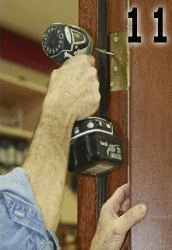
To relieve the tension on the top hinge and jamb, replace one of the top hinge screws with a screw long enough to penetrate the jamb and the wall framing (Fig.12).
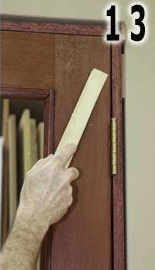
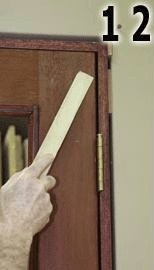
To relieve the tension on the top hinge and jamb, replace one of the top hinge screws with a screw long enough to penetrate the jamb and the wall framing (Fig.12). Do not torque this screw too much or the door will be jamb bound. A slight amount of pressure on that screw will correct the top hinge gap (Fig.13). And in the future, that screw can be loosened or tightened to correct the fit of the door in the event the home settles.
Support the hinge jamb
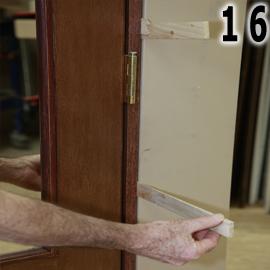
Insert pairs of shims—one from each direction—above and below each hinge, and every 12” on center (o.c.). Drive fasteners below the shims, not through the shims. The shims may have to be adjusted in order to improve the fit of the door (Fig.16).
Shim the strike side and head
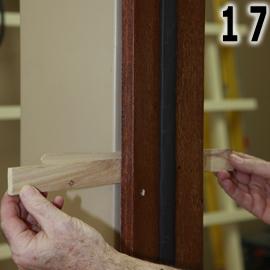
Insert shims every 12”. o.c. behind the strike jamb, and shim behind the lockset and dead bolt locations, too (Fig.17). Drive fasteners below the shims, not through the shims. Do not drive fasteners near the lockset or deadbolt locations.
Shim the head jamb so that the head gap is even across the top of the door.